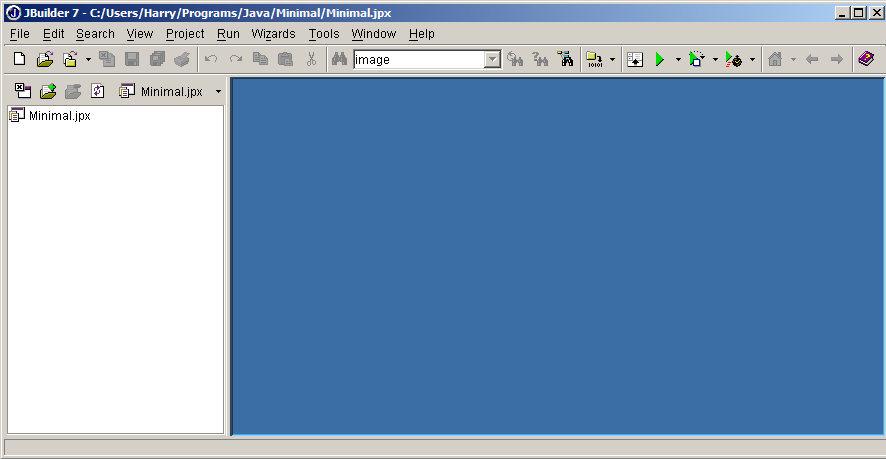
Open the JBuilder7 environment (usually done by running
C:\JBuilder7\bin\JBuilderW.exe).
The JBuilder IDE (Integrated
Development Environment) opens up.
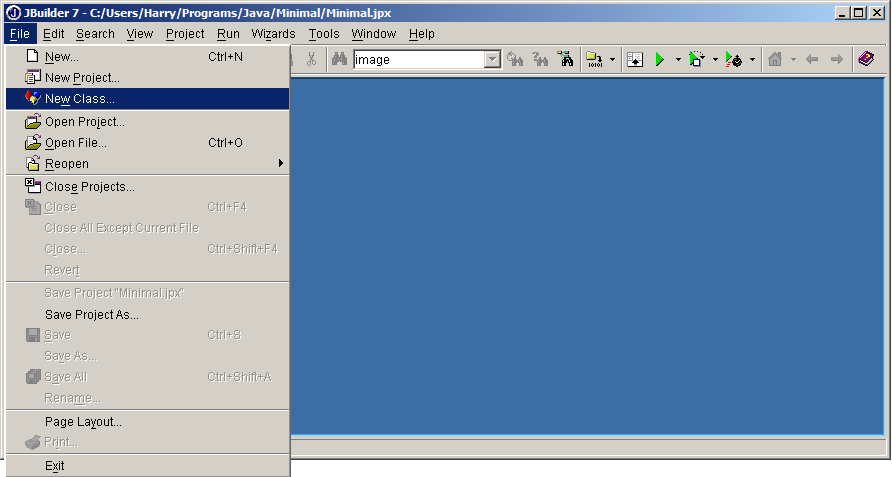
From the File option of the menu bar (at the
top) select [New Project]:
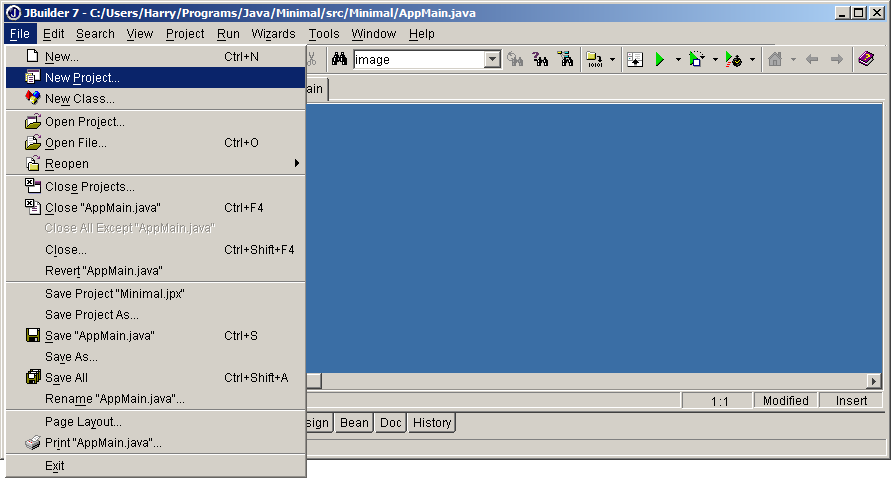
Clicking on [New Project] causes the following
dialog to appear:
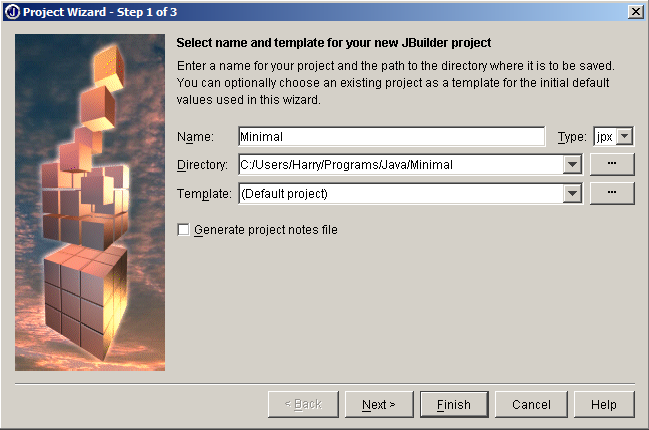
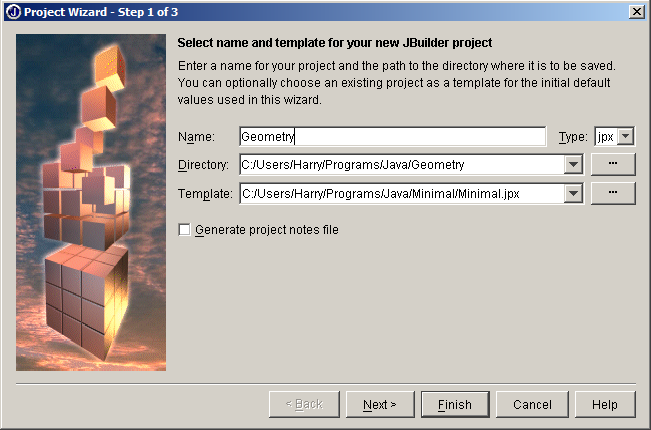
In the above dialog, the word “untitled1” that
originally appears in the Name field has been replaced by the
word “Minimal”, which is the name of the project that we will build.
In general, we select a name in ASCII characters for our project
name (not non-Latin characters, nor with spaces, because the same
name will be used for the folder names in which the project will be
stored, and JBuilder7 cannot handle non-ASCII letters for folder
names). Case sensitivity applies, and it is recommended to use a
capital first letter for the name of the project.
In the Template field select “(Default
project)” from the drop-down list.
Finally (in that order), go to the Directory
field and enter the folder name in which you want your project to be
stored. An example is shown in the above figure, assuming the
operating system is Windows 7 (which is responsible for the C:/Users
part of the folder name), and that the user of the system is called
“Harry”. Beyond that point, it is user Harry who decided to organize
his folders as shown (“Programs/Java”). The last part of the
Directory field is strongly recommended to be identical to the
project name (in our case: “Minimal”).
Click on button [Next >], at the bottom of the
dialog. A new dialog
appears, which is the second (and final) step in creating a new
project. The dialog looks like this:
It is recommended to leave the entries as shown above
in this dialog (with the path names adjusted to your computer’s file
structure, of course). If you want to know what the roles of the
above entries are, here is an explanation:
-
Output path is where
the compiled java code goes.
-
Backup path is where
JBuilder keeps backups of your source code files.
-
Working directory is
the top directory of your project.
-
The path checked as “Default”
in the “Source” tab is where your source code files are stored.
-
Finally, the path shown as
“Test” is never used.
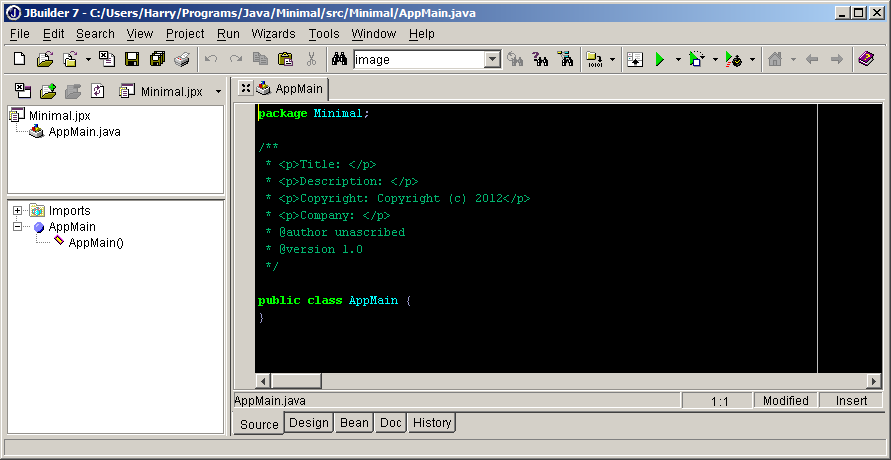
Click on button [Finish],
at the bottom. The main screen of the IDE now shows that we work on
project “Minimal”:
From the File option of the menu bar (top)
select [New Class]:
Now a new dialog pops up, prompting us to enter the
name of the class and other parameters associated with it:

In the “Package” field, the name of the
project appears initially in lower case letters. It is recommended
to correct the case of the letters so that it corresponds exactly to
the way our project was named (“Minimal”).
In the “Class name” field, enter: AppMain
This (“AppMain”) will be the name of the top-level
class of our program or applet. Its code will be given below, and
will remain virtually unchanged no matter how complex the rest of
the project becomes. Leave
the rest of the fields as they are, and click on button [OK]. Now we
see the AppMain class in the main window:
The above, shown against black background, is the
default code that JBuider7 created for our class “AppMain”. We will
fill that with our own code, soon. But first let’s do something
about those comments (enclosed in /* and */). We could of course go
and modify them now by hand, but if we do that we’ll have changed
only the comments of this class (AppMain), and whenever we create a
new class the same meaningless comments will be supplied. We can
change the default comments once and for all by going to the menu
bar and selecting Project and then Project
Properties...:
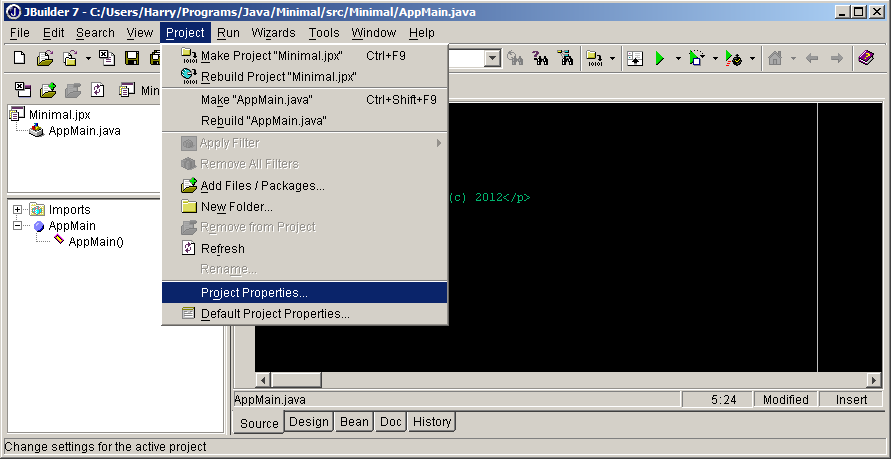
The “Project Properties” dialog will open up, looking
a lot like the one we saw at the first step of creating the project.
On that dialog, there is a series of tabs at the top. The first tab
reads “Paths”, and is the tab we are currently looking at. Click on
the next tab, which reads “General”:
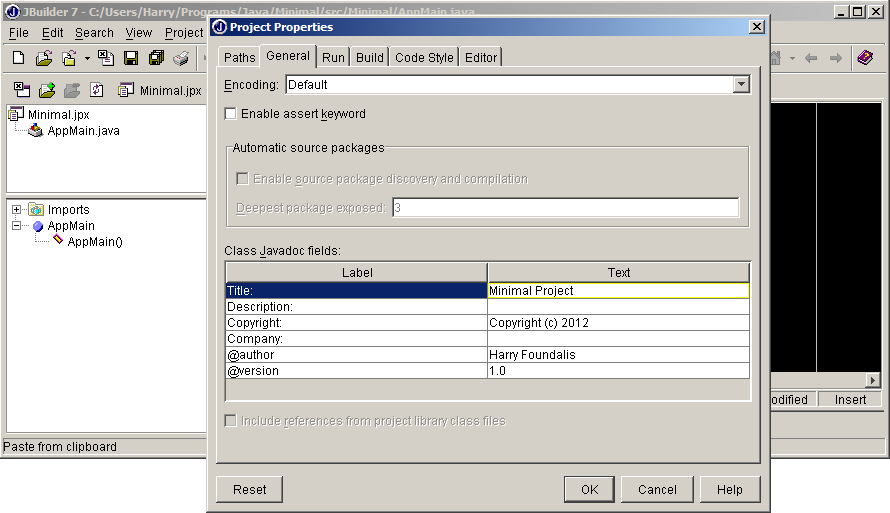
We then see what is supplied by default in the
comments section of every newly generated class. We can change those
values by double-clicking in the empty fields on the right. In the
example above, the title “Minimal Project” was entered by hand, as
well as the author’s name (“Harry Foundalis”). You should supply
your own name. Clicking on
button [OK] brings us back to the AppMain source code. The comments
are not changed automatically now (we’d have to change them by hand,
thins once only), but we’re ready to enter the proper code for
AppMain. You may now copy
the following code and paste into the AppMain editing area,
replacing the two lines that define an empty AppMain class. (Copy
and paste it as given below, with the spaces between the lines; the
spaces are such that when pasted into the JBuilder editor window
they will appear normal.)
import java.awt.event.*;
import java.awt.*;
import java.applet.*;
public class AppMain extends Applet {
   static AppFrame frame;
   AppPanel appPanel;
   boolean is_applet;
   public void init() {
      setLayout(new BorderLayout());
      is_applet = true;
      appPanel = new AppPanel (this);
      add ("Center", appPanel);
   }
   public void destroy () {
   }
   public void start () {
   }
   public static void main(String args[]) {
      AppMain appMain = new AppMain();
      appMain.init();
      appMain.is_applet = false;
      appMain.start();
      frame = new AppFrame (appMain);
   }
}
class AppFrame extends Frame implements ActionListener, WindowListener {
AppMain appMain;
   AppFrame (AppMain _appMain) {
      super();
      appMain = _appMain;
      setTitle("Minimal");
      add("Center", appMain);
      setSize (1000, 540);
      setVisible(true);
      addWindowListener (this);
   }
   public void actionPerformed (ActionEvent e) {
      String actionCommand = e.getActionCommand();
   }
public void windowActivated (WindowEvent e) {}
public void windowClosed (WindowEvent e) {}
   public void windowClosing (WindowEvent e) {
      setVisible (false);
      System.exit(1);
   }
public void windowDeactivated (WindowEvent e) {}
public void windowDeiconified (WindowEvent e) {}
public void windowIconified (WindowEvent e) {}
   public void windowOpened (WindowEvent e) {}
}
The above code, as mentioned
earlier, will not need to be modified in new projects, save for one
point: in the constructor (first method) of the AppFrame class,
there is a line that reads: “setTitle("Minimal");”.
The word “Minimal” on that line should be changed to whatever the
project name is. (That word appears on the title bar of the
program.) Once we paste the
above code into the editor window, we see two errors reported on the
left-side pane:
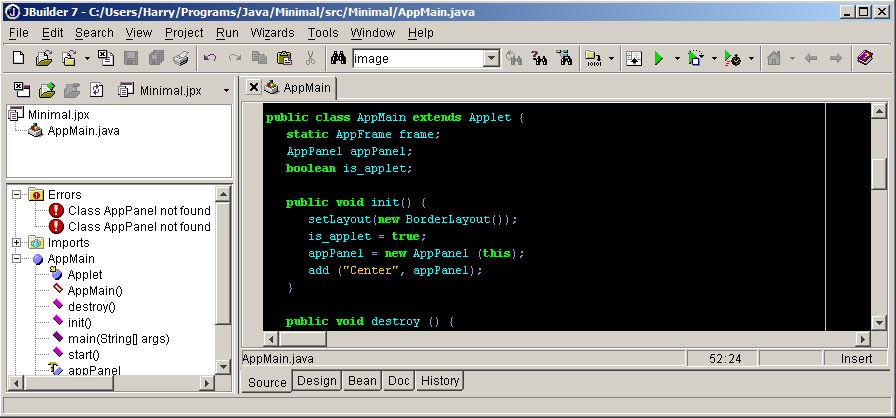
The errors read: “Class
AppPanel not found” (twice). That’s because we
haven’t defined the class AppPanel yet, which is the second
important class of our Minimal project.
Before defining the new class AppPanel, we should
note that by clicking (once) on each of the errors the IDE shows
where the error was detected in the source code. In general, this
will be the way we’ll spot out syntax errors in our source code.
Now we’re ready to create the second class of our
project, AppPanel. We do that in the same way we created the class
AppMain: by selecting File from the menu bar, and then [New
Class]:
(Note: this is a repetition of an earlier figure; in
your environment the editor window will not be empty but will
contain the source code of the AppMain class.)
In the dialog that opens up, we do the following:
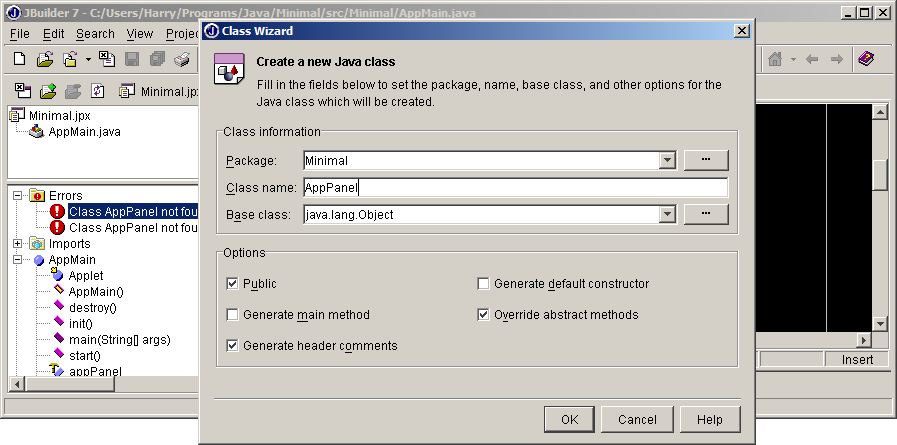
We should keep the suggested Package name
(“Minimal”), but change the suggested Class name from
“Untitled1” to “AppPanel”.
Clicking on [OK] we get the editor window with a default (empty)
AppPanel class:
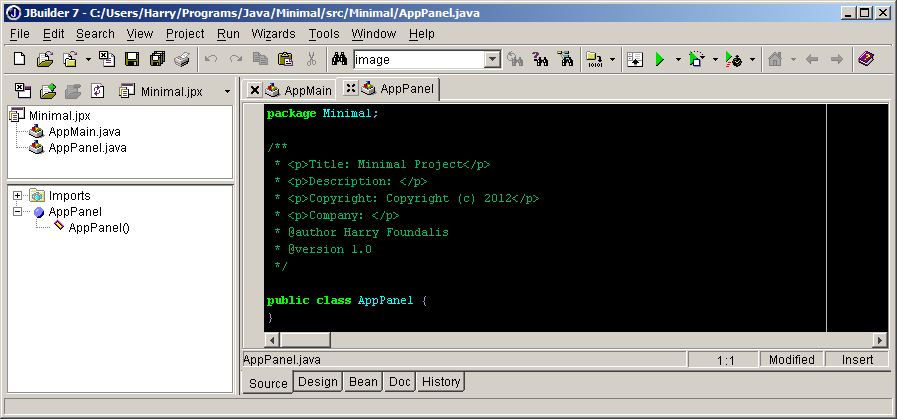
Note that now we see two tabs just above the editor
area: one that reads “AppMain” and another that reads “AppPanel”.
Each tab has a small button with an X
on its left. Clicking on that X
closes the tab (we don’t want to close any of them). If the
X is incomplete (missing
its central region), this is a sign that the source file of that
class hasn’t been saved. In the sample figure above, the source of
class AppMain has been saved (hence fully drawn
X), but the source of class
AppPanel is still unsaved (incomplete X).
Saving sources is very simple: just under the menu bar there is a
row of icons (buttons). The fifth icon shows a floppy disk, and the
sixth shows a multitude of them. Clicking on the single-disk icon
save the currently edited source file, whereas clicking on the
multi-disk icon saves all the unsaved-yet sources (and hence turns
all X’s to
complete). Clicking on those
tabs is the way we move from one source of our project to another.
And if a tab is ever closed by clicking on its
X, it can always be
recovered by double-clicking on the name of the class, on the left
pane of the IDE. We’re now
ready to copy-paste the code of AppPanel, just as we did before for
AppMain:
import java.awt.event.*;
import java.awt.*;
import java.applet.*;
public class AppPanel extends Panel implements MouseListener, KeyListener {
   AppMain appMain;                     // the class that creates 'this' class.
   boolean screenPainted;               // flag that controls method Paint().
   Color backgrColor;                   // window background color.
   public AppPanel (AppMain _appMain) {
      super();
      appMain = _appMain;
      screenPainted = false;
      backgrColor = Color.white;
      setBackground (backgrColor);
      addMouseListener(this);
      addKeyListener(this);
   }
   public void keyPressed (KeyEvent e) {
      if (e.getKeyCode() == KeyEvent.VK_F10) {
         //! Do something if key F10 is pressed, here.
      }
      // Other useful keys:
      // KeyEvent.VK_ENTER
      // KeyEvent.VK_ESCAPE
      // KeyEvent.VK_UP, ...DOWN, ...LEFT, ...RIGHT
   }
public void keyReleased (KeyEvent e) {}
   public void keyTyped (KeyEvent e) {
      char c = e.getKeyChar();
      if (c == 'A') {
         //! Do something if key 'A' is pressed on the keyboard, here.
      }
   }
public void mouseClicked(MouseEvent e) { e.consume(); }
public void mouseEntered(MouseEvent e) { e.consume(); }
public void mouseExited (MouseEvent e) { e.consume(); }
public void mousePressed(MouseEvent e) { e.consume(); }
   public void mouseReleased(MouseEvent e) {
      e.consume();
      Point point = new Point (e.getX(), e.getY());
      //! Code specifying what happens when clicking anywhere goes here.
   }
   public void paint (Graphics g) {
      int width = getBounds().width;
      int height = getBounds().height;
      if ( ! screenPainted) {
         screenPainted = true;
         //! Code specifying what must happen only once (i.e., initializations)
         //! when the window of the program has just opened, goes here.
      }
      // Code painting things every time the window of the program needs to
      // be painted goes here.
   }
}
The above code is not exactly
minimal, because it contains some template methods that show us how
to program things like mouse clicks and key presses on the keyboard.
Other than that, however, the code is pretty lean.
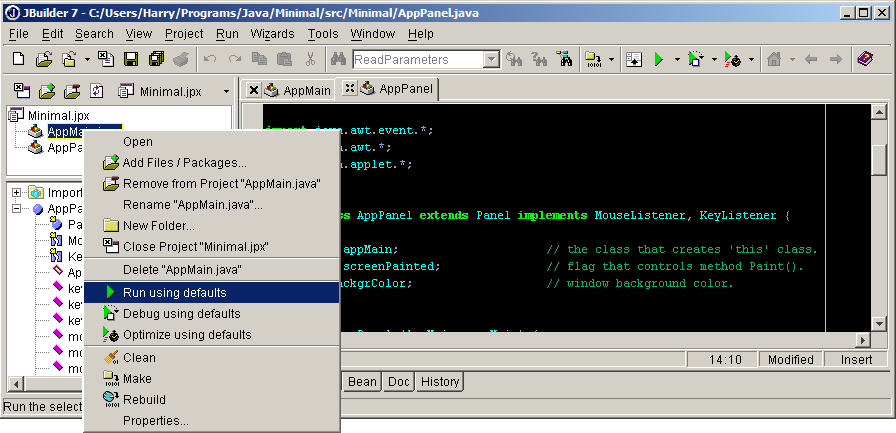
Now we should run our progran (which is also an
applet, simultaneously). We do this by right-clicking
on the word “AppMain.java” shown on the left pane, and then
selecting “Run using defaults” from the menu that pops up:
Upon doing that, we see our program/applet running,
creating an empty window. The color of the window is white if the
variable backgrColor was left initialized with value Color.white in
the constructor of class AppPanel. Close the window of our program,
go back to the AppPanel source, change the initialization of
backgrColor to something like Color.blue, and run the program again
to see its window appearing with a blue background color.
This concludes our first attempt at creating and running a
program (and applet) using the JBuilder7 IDE. |